Did you know that you can enhance your furniture with brass fittings without ever picking up a nail? This creative approach not only adds a touch of rustic charm to your home but also preserves the integrity of your beloved pieces. Brass fittings can seamlessly join wood and metal, allowing for stylish, functional designs that are completely reversible. Imagine breathing new life into an old chair or crafting unique shelving that reflects your personal style, all while embracing the delightful DIY spirit of cottage living. In this guide, we’ll explore how to apply brass fittings to furniture, creating connections that are as sturdy as they are beautiful. Step into the world of handcrafted elegance, where every project encourages you to celebrate creativity and connect with your cozy, rustic lifestyle. Ready to embark on this inspiring journey? Let’s dive in!
Understanding Brass Fittings and Their Benefits

Brass fittings are not just functional components; they are also elegant accents that can infuse warmth and rustic charm into your furniture projects. Often overlooked in favor of modern materials, brass offers a timeless appeal that resonates beautifully with cottage living aesthetics. Its natural golden hue and unique patina develop over time, enhancing the character of your pieces. By incorporating brass fittings, you not only ensure durability but also embrace an artisanal touch that celebrates handmade beauty.
One of the most compelling benefits of using brass fittings is their exceptional strength and resilience. This metal is resistant to corrosion, making it a perfect choice for various applications, including furniture assembly where moisture may play a role. Unlike conventional nails that can split wood or weaken joints, brass fittings provide a sturdy and reliable connection. Additionally, they can be easily disassembled and reassembled, allowing for flexibility in your designs. Whether it’s securing shelves or crafting intricate hinges for a cabinet, these fittings empower DIY enthusiasts to explore their creativity without compromising stability.
Moreover, brass fittings allow for a range of design possibilities. Their ability to blend seamlessly with a variety of materials-from wood to fabric-means you can tailor your projects to your unique style. Utilizing fixtures like brass knobs, corners, and connectors can elevate even the simplest pieces of furniture, turning them into conversation starters. Incorporating these fittings also reflects a commitment to craftsmanship, resonating with a growing community that values sustainability and thoughtful design in their living spaces. In essence, brass fittings are not merely functional but are also an artistic choice that harmonizes with the cozy, rustic charm of a cottage lifestyle.
Essential Tools for Applying Brass Fittings
When it comes to applying brass fittings to your furniture, having the right tools at your fingertips can make all the difference. Picture this: you’re nestled in your cozy cottage, sun filtering through the windows, and you’re ready to add that touch of elegance to your handcrafted piece. With the appropriate tools, you’ll find that the task is not only simpler but also more enjoyable, allowing your creative spirit to soar.
To get started, gather the following essential tools that will facilitate a smooth application of brass fittings:
- Measuring Tape: Precision is key. A good measuring tape helps ensure that your brass fittings are placed at the correct distances, helping maintain balance and aesthetics in your design.
- Screwdriver Set: A variety of screwdrivers (flathead and Phillips) will be necessary for fastening fittings securely. Choose a set with magnetic tips for easier handling of small screws.
- Drill and Drill Bits: For more extensive projects, a drill will allow you to create clean, precise holes for your brass fittings. Having a set of drill bits in various sizes is advantageous, especially for different types of fittings.
- Glue for Metal: If you prefer a nail-free option, a strong adhesive specifically designed for metal will secure your fittings beautifully without the need for mechanical fasteners.
- Clamps: To hold your pieces in place while the adhesive cures or while you’re working, clamps are invaluable. They can prevent shifting, ensuring that everything aligns perfectly.
- Sandpaper or File: Smooth out any rough edges on your furniture or the fittings themselves. This not only helps in achieving a professional look but also ensures a secure fit.
- Polishing Cloth: After application, a light buffing with a polishing cloth will make your brass fittings shimmer, enhancing the rustic charm of your furniture.
Having these tools readily available not only simplifies your task but also immerses you in the joy of crafting and DIY home improvement, quintessential elements of cottage living culture. Each time you apply these fittings, you’re creating a beautiful synthesis of function and artistry, embracing the humility of handmade craft. The right tools empower you to turn your vision into reality, turning every project into a cherished memory in your cozy abode. Embrace these simple joys and let your imagination enrich your space!
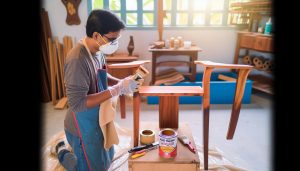
Step-by-Step Guide to Attach Brass Fittings
Imagine the warm glow of brass fittings adorning your handcrafted furniture, reflecting the delicate charm of cottage living. Applying these timeless pieces without nails is a delightful way to ensure your creations remain both sturdy and aesthetically pleasing. Below, you’ll find a straightforward guide to help you seamlessly attach brass fittings in a way that harmonizes with your rustic décor.
Begin by ensuring you have all your tools ready and your workspace tidy. Say goodbye to messy margins! Measure the exact placement of your brass fittings with a measuring tape, marking the areas where they will attach to the furniture. Be precise, as this step sets the stage for a polished look.
Next, if you’re using a drill, carefully create clean holes in your furniture, ensuring they are the right size for your brass fittings. If you opt for adhesive, apply a small amount to the fitting itself. Be sure to choose a glue specifically designed for metal, as this ensures a lasting bond without compromising your furniture’s beauty. Place the fitting in position, pressing gently but firmly to allow the adhesive to take hold.
To keep everything aligned while the glue cures, use clamps to hold the fittings in place. This not only prevents any shifts but also allows you to step back and admire your work as you wait for the bond to set. Lastly, once the glue has fully cured, take a moment to gently polish the brass fittings with a cloth, enhancing their luster and tying together the rustic aesthetics of your space.
With this approachable method, you’re not just attaching fittings; you’re adding a character that’s both functionally sound and aesthetically delightful, encapsulating the spirit of handcrafted beauty in your cozy abode. Embrace the simple pleasures of DIY projects, allowing your creativity to shine through your work!
Creative Design Ideas for Furniture with Brass

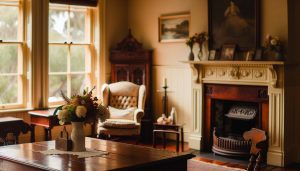
In the quaint world of cottage living, brass fittings are more than just functional hardware; they are charming accents that elevate the aesthetic of your handcrafted furniture. These shiny embellishments bring warmth and character to even the simplest pieces, creating a cozy yet sophisticated atmosphere. Imagine the soft sheen of brass catches the light, bringing a golden glow to your favorite rustic shelves or a vintage table, seamlessly blending style and utility.
One delightful way to incorporate brass fittings into your furniture design is by using them as decorative elements rather than mere attachments. For instance, you can use brass corner brackets on wooden tables or shelving units. These not only reinforce the structure but also add a touch of elegance. Consider selecting fittings that showcase intricate designs or vintage finishes-each piece tells a story, enhancing the overall charm of your home. For a more whimsical twist, experiment with brass knobs or handles on kitchen cabinets or dresser drawers, making everyday items pop with unique character.
Another innovative idea is to integrate brass fittings into furniture-making itself. Using them in conjunction with glass or wood, create tabletops or shelving that highlight the contrast of materials. Brass pipes can serve as stylish legs for a coffee table, providing stability while adding an industrial touch to your space. Additionally, if you’re feeling particularly creative, try crafting miniature builds with brass fittings for a delightful display on your mantle or as unique gifts for loved ones.
In this spirit of creativity, consider creating a DIY project-perhaps a rustic birdhouse decorated with brass embellishments, or a picture frame that features delicate brass corners. These projects not only offer a perfect touch of personality to your decor but also provide a meaningful way to express your creativity and celebrate the simple joys of handcrafted beauty.
Embrace the warmth of brass in your furniture designs, and let your imagination flourish. It’s all about creating spaces where every item feels both lovingly crafted and joyfully used, embodying the very essence of cozy, rustic living.
Comparing Adhesives for Brass Fittings
When venturing into the realm of attaching brass fittings to your beloved furniture pieces, the choice of adhesive can significantly influence the longevity and aesthetic appeal of your project. Although many might instinctively reach for screws or nails, using adhesives provides a seamless, polished finish that maintains the elegance of your rustic designs. Let’s explore some popular adhesive options tailored specifically for brass fittings, ensuring that your handcrafted treasures remain beautiful and strong without the visible intrusion of hardware.
One of the most trusted choices for bonding brass fittings is epoxy resin. This two-part adhesive forms an exceptionally strong bond that is both waterproof and heat-resistant, making it ideal for furniture that sees daily use. To apply, simply mix the two components as directed, and apply a thin layer to both surfaces before pressing them together. Epoxy’s ability to fill gaps also means you won’t have to worry about achieving perfect alignment on the first try. Just be sure to work in a well-ventilated space and allow adequate curing time for optimal results.
Other adhesive options to consider:
- Super Glue: Quick and convenient, cyanoacrylate glue (commonly known as super glue) is perfect for smaller fittings. It sets rapidly, but be cautious with heavier loads, as it may not offer the same durability as epoxy.
- Silicone Adhesive: If flexibility is key, silicone adhesives provide a lasting bond that can withstand slight movements without cracking. This is a great choice for pieces that experience temperature fluctuations or if you want to prevent moisture from seeping into your wood.
- Hot Glue: While not the most durable option, hot glue is excellent for temporary setups or for projects where you want to test the aesthetics before committing. Keep in mind that it may not hold up well under stress.
Selecting the right adhesive ultimately depends on the specifics of your project-the weight of the fittings, the materials at play, and the desired ease of application. For an engaging visual contrast, consider using brass fittings in combination with painted surfaces; the reflective quality of brass against softer tones can create an inviting atmosphere, perfect for any cozy cottage aesthetic.
In the charming journey of DIY crafting, experimenting with different adhesives can elevate your furniture projects to new heights and ensure your bespoke creations are cherished for years to come. Each decision, from the type of brass fitting to the adhesive used, brings you one step closer to realizing your unique vision of cozy, rustic living.
Caring for Brass Fittings on Furniture
Brass fittings are not only functional elements in your furniture projects; they also add a timeless beauty that complements any rustic setting. To keep these charming accents looking their best, caring for brass fittings is essential. Over time, brass can tarnish, but with a little bit of love and proper maintenance, these fittings can shine brilliantly, enhancing the cozy aesthetic of your home.
To maintain the luster of brass fittings, start with a gentle cleaning routine. A simple mixture of equal parts vinegar and water can work wonders. Soak a soft cloth in this solution and gently wipe the fittings, avoiding abrasive cleaners that might scratch the surface. For tougher tarnish, consider a paste made of baking soda and water. Rub it lightly onto the tarnished areas and rinse thoroughly to reveal shiny brass beneath. Remember, the key is to treat your fittings delicately-after all, they’re not just hardware; they’re part of your home’s character.
Preventative Care and Protection
To keep your brass fittings looking fresh and minimize tarnishing, a protective coating is invaluable. After cleaning, consider applying a thin layer of clear lacquer or brass polish to seal the surface and create a barrier against oxidation. Reapplying this coating every few months will help maintain that immaculate shine and protect against moisture, particularly important in homes with changing weather.
For those who enjoy the unique patina that develops on antique brass, periodic maintenance becomes less about achieving a perfect shine and more about embracing the charm of aged beauty. A light dusting with a dry microfiber cloth can prevent dust buildup while keeping the vintage appeal intact.
Incorporating Brass Into Your Decor
Incorporating brass fittings into your home decor isn’t just about function; it’s about celebrating craftsmanship. The glimmer of brass against worn wood or rustic fabrics can create a warm, inviting atmosphere. Whether you’re crafting a simple coffee table or a more elaborate piece, envision how these fittings can enhance the overall design. Opt for brass knobs on reclaimed wood cabinets, or use elegant brass accents in garden furniture. The synergy created between handcrafted elements and shiny brass accents reflects both care and creativity, cultivating a space that feels both personalized and inviting.
Embrace the art of caring for your brass fittings as part of your home’s journey, honoring both the beauty of your pieces and the memories you create around them. Each polished surface not only serves a purpose but tells a story-a snapshot of cozy moments shared in the welcoming embrace of your lovely cottage home.
Troubleshooting Common Issues with Brass Fittings
When integrating brass fittings into your furniture projects without nails, some common challenges may arise that can affect both the functionality and aesthetic of your creations. Understanding these issues can help you find practical solutions, ensuring your brass accents shine with the charm and warmth of cottage living.
One of the most common dilemmas involves adhesive failure, often caused by inadequate surface preparation. For a strong bond, surfaces must be clean and free of dust or grease. Before applying any adhesive, take a moment to wipe down the brass fittings and the furniture surface with a cloth dampened in rubbing alcohol. Allow it to dry completely to ensure the best adhesion. If your adhesive is taking too long to set, it’s essential to check the temperature and humidity levels in your workspace. Most adhesives work best in moderate conditions; if your environment is too cold or damp, the bond may not cure properly.
Sometimes, you might notice that the brass fittings simply do not seem to align correctly with the furniture component. A helpful tip here is to use a jig or template to hold the fittings in position as the adhesive cures. Create a simple jig with scrap wood or even cardboard to maintain perfect alignment and avoid any unwanted shifts during the drying process. If you’re working with intricate designs, consider employing a light-duty clamp to hold the fittings securely while the adhesive sets, providing that added layer of stability.
Another common issue is the inability to remove fittings without damaging the furniture later on. To mitigate this, opt for repairable adhesive solutions, such as removable mounting putty or hook-and-loop fasteners, which allow for easy adjustments or removals without destruction. Remember, beauty in craftsmanship often lies in flexibility, allowing you to rearrange or enhance your projects over time.
Lastly, if brass fittings become loose over time, consider periodic checks. A gentle reminder to assess the fittings during routine home maintenance can go a long way. If needed, reapply an appropriate adhesive or tighten fasteners gently. Embrace these moments as part of your home’s evolving story; after all, your cozy cottage reflects a life filled with lovingly crafted memories and creative adaptations.
With these gentle troubleshooting tips, the challenges of working with brass fittings can be transformed into opportunities, fostering an inspiring environment for your furniture projects. Embrace the rustic charm that brass brings to your decor, enhancing both functionality and warmth within your home.
Sustainable Alternatives to Traditional Fittings
In the quest for a more sustainable lifestyle, embracing alternatives to traditional fittings not only enhances your furniture projects but also aligns beautifully with the serene charm of cottage living. While brass fittings offer timeless elegance, their environmental footprint can lead some to seek eco-friendlier substitutes. Thankfully, a variety of materials provide aesthetic and functional benefits that resonate with both rustic style and sustainability.
Natural Wood Fittings: One wonderful alternative is using fittings crafted from reclaimed wood. Sourced from old furniture or barn wood, these fittings maintain a rustic look while offering a unique story and character to each piece. Working with wood not only minimizes waste but also promotes the beauty of handcrafted items. The gentle grains and natural imperfections lend a warm, authentic touch, embodying the very essence of cottage charm.
Biodegradable Materials: Consider fittings made from biodegradable composites, such as bamboo or cork. Bamboo is known for its rapid growth and renewability, making it an excellent choice for eco-conscious makers. Similarly, cork, harvested from the bark of cork oak trees, provides a lightweight option that is both durable and sustainable. These materials can be used creatively in furniture design, accentuating the rustic aesthetic while remaining environmentally friendly.
Recycled Metal Options: For those who prefer the metallic look without the new material footprint, recycled metal fittings represent a fantastic compromise. Reclaimed brass or other metals can be sourced from local salvage yards or artisans who specialize in upcycling. By choosing these fittings, you not only reduce your reliance on newly mined materials but also support local craftspeople and the principles of a circular economy.
By opting for sustainable alternatives in your furniture projects, you embody a lifestyle that values resourcefulness and nurtures creativity. Whether you’re crafting pieces that encapsulate the warmth of home or designing furniture that serves as a statement of your eco-conscious values, the journey begins with simple choices-like embracing the beauty of nature and the stories inherent in reclaimed materials. As you delve into your next DIY endeavor, remember that every small step toward sustainability can contribute to a larger narrative of beauty and responsibility in your home.
Elevating Your Decor with Brass Accents
Transforming a space with brass accents can elevate the charm of any cottage-style decor, infusing a warm, inviting glow that encapsulates the essence of rustic living. Brass fittings are not just functional; they serve as decorative elements that can seamlessly blend with your handcrafted furniture projects, making every piece feel thoughtfully curated. The gentle shimmer of brass captures light beautifully, adding a touch of elegance to wooden surfaces or fabric textures. What’s more, these fittings often tell a story of craftsmanship and character, reinforcing your connection to the art of DIY decor.
When integrating brass accents into your furniture, consider their versatility. You can use them to blend different materials, harmonizing with wood, leather, and soft textiles. For instance, attach brass corners to a reclaimed wood table or use brass handles on a painted chest. Such applications not only enhance functionality but also create visual interest. To elevate your decor effortlessly, experiment with various finishes; polished brass can brighten a space, while brushed or antiqued brass adds a rustic touch, drawing attention to the natural beauty of your chosen materials.
Incorporating brass into your design doesn’t have to be overwhelming. Start small by adding brass fixtures like hooks or knobs to existing furniture for an instant update. You might also think about creating accent pieces-consider a side table crafted from timber, adorned with brass inlays. This combination of materials ensures that you maintain a cozy, rustic aesthetic while introducing a modern twist. For those feeling adventurous, DIY projects involving brass fittings can lead to stunning results, such as a vintage-inspired bookshelf or a bespoke headboard, each serving as a conversation starter within your home.
Moreover, a cohesive theme can be established by repeating brass elements throughout your decor. Whether you’re crafting a living room, kitchen, or workspace, intertwining brass accents can foster a sense of unity. Picture a reading nook with brass bookends, a table lamp with a brass base, and a handmade shelf featuring brass brackets; together, they create a cozy corner that welcomes you home. As you work with brass, remember that each fitting you choose not only reinforces the functionality of your furniture but also reflects your personal style and commitment to handmade beauty. Embrace the warmth of brass and let your creativity flourish, making your space a true reflection of your rustic charm and community connection.
Inspiring Miniature Builds Using Brass Fittings
The charm of working with brass fittings extends beautifully into the world of miniature builds, allowing artisans to craft delightful pieces that embody a cozy and inviting aesthetic. Miniature furniture, adorned with brass accents, not only serves creative expression but also evokes nostalgia, reminiscent of simpler times spent in snug cottages filled with handcrafted treasures. Using brass fittings in these tiny creations can elevate their appearance, adding a sense of elegance and warmth that contemporary materials often lack.
Creating miniature builds with brass fittings opens a myriad of possibilities. Consider starting with a tiny wooden chair or table; by integrating brass corners or handles, you can recreate the timeless look of antique furniture. For instance, a small bookcase crafted from reclaimed wood can be enhanced with brass brackets for a rustic yet polished finish. This application not only strengthens the structure but also infuses it with character. You might also incorporate miniature brass hinges on tiny cabinets or chests, transforming functional pieces into stunning displays that offer both utility and style.
Practical Applications
When working on these miniature projects, employing adhesives instead of nails can be particularly beneficial. Here are a few practical tips to ensure your builds are both sturdy and beautiful:
- Choose the Right Adhesive: Use a strong, quick-drying adhesive specifically designed for metal and wood. This ensures a secure bond without the need for nails, maintaining the integrity of your design.
- Consider Aesthetics: Plan your design carefully to highlight the brass fittings. Position them to draw the eye and enhance the overall look of the piece.
- Experiment with Finishes: Try mixing polished and antiqued brass for contrasting effects. This can add depth and visual interest to your miniatures, making them stand out on display.
- Functional Art: Miniature furniture doesn’t just sit on a shelf; consider building small storage solutions, like drawers, that open easily thanks to well-placed brass fittings.
Through these woodworking projects, you can foster a deep connection with community crafting traditions. As you create each piece, think about sharing your journey with fellow makers or even showcasing your miniatures at local craft fairs. Every tiny project becomes a story, a moment captured in time that celebrates the joy of handmade artistry. By incorporating brass fittings into your miniature builds, you’re not just crafting furniture; you’re nurturing a love for rustic charm and the warmth of cottage life that can inspire others to embrace this wonderful, creative endeavor.
Real-Life Success Stories: DIY Brass Furniture Projects
There’s a certain magic in the stories that unfold during the DIY process of crafting furniture with brass fittings, a journey marked by creativity and connection. From quaint garden sheds transformed into charming workshops to living rooms pampered with handcrafted pieces, individuals have embraced the art of using brass fittings not just for functionality but to infuse their homes with warmth and character. One inspiring tale comes from a couple who decided to convert an old wooden crate into a coffee table. By skillfully attaching brass corner brackets, they not only reinforced the structure but also gave it a delightful vintage flair that perfectly complemented their rustic living room.
Consider the journey of a young artist who faced the challenge of creating a unique bookshelf. Rather than resorting to traditional nails, she opted for a method that celebrated her craftsmanship. Using brass shelf fittings and a strong adhesive, she brought her vision to life, transforming reclaimed wood into a stunning display piece. The brass accents added an eye-catching shimmer, making the bookshelf a focal point that sparked joy and conversation. Her ingenious approach, which avoided visible fasteners, showcased her commitment to not only style but also to sustainable practices-she repurposed materials while crafting something beautiful.
Crafting Community Connections
Perhaps one of the most heartwarming aspects of these DIY projects is the sense of community they foster. On forums and social media platforms, makers share their successes and learnings, inviting others into their creative spaces. A particularly touching story involves a local crafting group that met weekly to explore the integration of brass fittings into their projects. Together, they experimented with different adhesives and techniques, pooling their knowledge to help each other achieve stunning results. The camaraderie built through these shared experiences turned into friendships, proving that crafting can illuminate not just homes but also hearts.
As you venture into the world of DIY brass furniture projects, remember that each piece you create is a story waiting to be shared-a tale of inspiration, creativity, and personal connection. Embrace the challenge, celebrate the process, and let the beauty of brass fittings guide you towards your own success story in the cozy realms of cottage living.
Frequently asked questions
Q: How can I securely attach brass fittings to furniture without nails?
A: To securely attach brass fittings without nails, use strong adhesives like epoxy or super glue. Clean the surfaces, apply the adhesive generously, and press the fitting firmly. Allow it to cure completely to ensure a strong bond, enhancing both durability and aesthetics.
Q: What alternatives exist to nails for attaching brass fittings?
A: Alternatives to nails for attaching brass fittings include strong adhesives, screws, and mounting compounds. Each option varies in permanence and ease, so choose based on the functionality and aesthetic desired for your furniture item.
Q: How do I choose the right adhesive for brass fittings?
A: Choose an adhesive that is specifically formulated for metal, such as epoxy or a strong urethane-based glue. Check for features like waterproofing and heat resistance according to where the furniture will be used, enhancing longevity while maintaining the elegant look of brass.
Q: What preparation is needed before applying brass fittings to furniture?
A: Before applying brass fittings, clean both the fitting and the surface of the furniture with isopropyl alcohol to remove any grease or dirt. This ensures maximum adhesion. Additionally, sand the area lightly for better grip if necessary, providing a sturdy base for attachment.
Q: Can I remove brass fittings without damaging furniture?
A: Yes, brass fittings can often be removed without damaging furniture by carefully applying heat to soften the adhesive. Use a heat gun or hairdryer to warm the area, then gently pry off the fitting using a plastic scraper to avoid scratches, ensuring the wood remains intact.
Q: How long does adhesive take to fully set on brass fittings?
A: Most adhesives used for brass fittings will set within a few minutes, but full curing time can take up to 24 hours. Always check the manufacturer’s guidelines for the specific product you are using to ensure optimal bonding strength.
Q: Are there specific brass fitting designs that work better without nails?
A: Yes, decorative brass fittings designed with larger surface areas are often more effective when attached with adhesives. Consider flat plates or corner brackets as they provide greater contact points, ensuring a more secure and stable hold without nails.
Q: What common mistakes should I avoid when applying brass fittings?
A: Avoid common mistakes such as not cleaning surfaces properly, using the wrong adhesive, and applying too much glue. Over-application can lead to messiness and ineffective attachment. Always follow instructions for the specific adhesive chosen, ensuring a clean and efficient process.
To Conclude
Now that you’ve uncovered the charm of applying brass fittings to your furniture without nails, it’s time to let your creativity flow! Imagine the rustic elegance these fittings can bring to your home, enhancing your DIY projects and adding a touch of sophistication. Don’t forget to explore our related guides on rustic home design and ingenious DIY decor projects to inspire your next masterpiece.
Feeling inspired? Jump over to our seasonal gardening tips for refreshing your outdoor spaces, or check out our charming farmhouse recipes to complement your decorated corners with home-cooked delights. Remember, every small project adds warmth and character to your cozy cottage lifestyle.
Join our community by signing up for our newsletter, where you’ll receive the latest tips and tutorials straight to your inbox. Share your thoughts or your own brass fitting creations in the comments below; we love hearing from our fellow makers! Embrace the simple joys of crafting and let your rustic journey flourish!