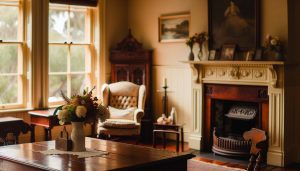
Are you dreaming of a cozy cottage filled with charm and character? Applying parchment to your furniture is a delightful way to achieve that vintage appeal while preserving the natural beauty of your wood pieces. This technique not only enhances the aesthetics but also taps into the heartwarming traditions of cottage living, where every item tells a story and blends seamlessly with the soothing ambiance of nature. In a world saturated with modern design, embracing rustic DIY projects like this allows you to create a personalized space that reflects your unique taste and love for craftsmanship. Join us as we explore the simple yet transformative process of applying parchment to furniture, unlocking the potential to breathe new life into your home while fostering a connection to the past. Your journey to a more inviting and nostalgic living space starts here!
Choosing the Right Parchment for Your Furniture Project
Selecting the perfect parchment for your furniture project can be a delightful journey, much like curating a charming decor that embodies the essence of cottage living. Parchment comes in various textures, colors, and finishes, providing an opportunity to infuse your pieces with a rustic yet refined character. Whether you’re aiming for a soft, aged look reminiscent of grandmother’s cozy cottage or a more vibrant style that pops with personality, the right parchment can make all the difference.
When considering your options, think about the overall vibe you want to achieve. Natural and earthy tones work well in traditional cottage designs, evoking warmth and comfort. Look for parchment with a subtle grain or soft, muted colors that naturally blend with wooden furniture and soft textiles. On the other hand, if you’re drawn to a more contemporary twist, bold patterns or brighter hues can bring a fresh touch to vintage pieces.
Before making your final decision, it’s also essential to consider the specific furniture you will be working with. For example, choosing a durable parchment that withstands wear and tear is vital for items like chairs and tables that see daily use. In contrast, lighter-weight parchment could suffice for decorative accents or pieces that receive less contact.
Lastly, don’t forget to experiment! Combining different textures or layering parchment can create depth and intrigue, transforming your furniture into a focal point that tells a story. As you embark on this project, embrace the joy of creativity, allowing your unique style to shine through every choice you make.
Essential Tools for Applying Parchment Effectively
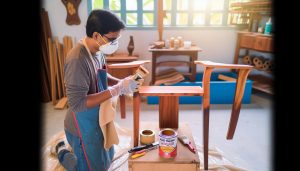
To embark on your charming journey of applying parchment to furniture, gathering the right tools is essential, as each item plays a pivotal role in enhancing both the experience and the outcome. Crafting a delightful vintage cottage aesthetic requires not just inspiration but also the practicality of having a well-equipped workspace. Here’s a cozy guide to the must-have tools that will help you achieve that homely, rustic charm.
The cornerstone of your parchment application toolkit should begin with high-quality adhesives. A versatile, strong glue, such as a good wood glue or an adhesive specifically tailored for paper products, can make all the difference. Choose adhesives that dry clear to keep the focus on the beautiful parchment design. Additionally, investing in a brayer or a foam roller can help ensure even application and prevent air bubbles, resulting in a smooth, flawless finish.
Next, consider the importance of cutting tools. A sharp craft knife or rotary cutter paired with a cutting mat can provide precision when trimming parchment edges to fit your furniture pieces perfectly. To achieve accurate lines, a metal ruler or straightedge will help guide your blade effectively. Remember, neat edges create a polished final look that enhances the overall cottage aesthetic.
Lastly, don’t overlook the value of finishing materials. Depending on the look you desire, a clear coat of sealer or finish can protect your handiwork and elevate its appearance. Options such as matte or satin finishes can add just the right touch of elegance without overpowering the rustic charm. Keep a set of fine brushes or a spray can handy for easy application of these finishes to ensure that every corner of your project receives the care it deserves.
With these tools at your side, you’re not just preparing for a project; you’re setting the stage for creativity to flourish. Embrace the process, and soon enough, your furniture will radiate that inviting charm, embodying the essence of cottage living while showcasing your unique style.
Step-by-Step Guide to Parchment Application
To create a charming vintage cottage ambiance, applying parchment to your furniture can be a delightful and transformative project. The process is simpler than one might think, allowing you to breathe new life into old pieces while adding a touch of rustic elegance. Here’s a cozy step-by-step guide to help you navigate this creative journey.
Begin by selecting your parchment. Choose a design that resonates with the warm, inviting aesthetic of cottage decor. Once you have your parchment ready, prepare your furniture surface by cleaning it thoroughly to remove any dust or grease that could interfere with adhesion. If needed, lightly sand the surface to create a better grip for the adhesive.
Next, measure and cut your parchment to size. Use a sharp craft knife and cutting mat for clean edges, ensuring that the pieces fit your furniture perfectly. Taking your time with this step will pay off, as neat edges create a polished finish. After cutting, lay the parchment onto your furniture without adhesive first, just to visualize how it will look and make any final adjustments.
Now, it’s time for the adhesive. Apply a thin, even layer of glue to the furniture surface using a brush or foam roller. Carefully position the parchment onto the glue, starting from one end and slowly smoothing it down to avoid bubbles. Use a brayer or a clean cloth to press down firmly, ensuring complete contact between the parchment and the surface.
Once your parchment is securely in place, allow it to dry completely, following the recommended drying time on your adhesive. For added protection and to enhance the beauty of your new design, consider sealing your work with a clear coat of finish. This step is crucial for ensuring longevity and preserving the lovely details you’ve created. After the sealant has dried, step back and admire your handiwork-there’s nothing quite like the satisfaction of a DIY project well done!
Incorporate these steps into your crafting process, and you’ll soon find that your aged furniture is transformed into a stunning centerpiece that echoes the cozy charm of cottage living. Enjoy the process, celebrate your creativity, and let your personality shine through in every piece you touch.
Creating Charming Vintage Cottage Designs

Applying parchment to your furniture opens up a world of creative possibilities that can truly evoke the warm, welcoming spirit of vintage cottage aesthetics. Imagine stepping into a room filled with the soft light filtering through lace curtains, with rustic wooden furniture transformed into charming focal points that tell a story. The right parchment can enhance the cottage feel, reflecting the beauty of handcrafted details and timeless simplicity, inviting everyone to experience the cozy embrace of cottage living.
To create stunning vintage cottage designs, start by envisioning the overall ambiance you wish to cultivate. Look for parchment patterns that resonate with nature-floral motifs or soft pastels can evoke the idyllic surroundings of a tranquil garden. Incorporating elements such as distressed finishes or worn textures alongside your parchment can further enhance the rustic appeal. For example, an old wooden table can be revitalized with a delicate floral parchment that wraps around its legs, contrasting beautifully with the natural grain of the wood. Additionally, incorporating contrasting colors-like soft greens paired with creamy whites-can invoke a sense of harmony and tranquility inspired by nature.
Creating layers with different textures is another essential aspect of cottage design. Balance the smoothness of parchment with rougher elements such as burlap, linen, or reclaimed wood accents. This interplay not only adds depth to your decor but also reinforces the handcrafted essence of cottage living. When applying parchment, consider using it strategically on smaller items, such as side tables or decorative accents, to create a cohesive theme throughout the space without overwhelming the senses.
As you work on your project, stay mindful of the small details. A meticulously placed antique knob or a simple, hand-painted sign can elevate the entire design aesthetic, seamlessly weaving together the charm of vintage cottage decor. Remember, the goal is to celebrate the beauty of imperfections and the joy of creating something uniquely yours. By thoughtfully choosing your parchment and combining it with complementary textures and colors, you can transform any piece of furniture into a beloved centerpiece that encapsulates the enchanting allure of vintage cottage living. Embrace this simple, rewarding journey, and let your creativity flourish!
Tips for Achieving Perfect Adhesion and Finish

Achieving a perfect adhesion and finish when applying parchment to your furniture is crucial for creating that dreamy vintage cottage feel. The right preparation and technique not only enhance the aesthetic appeal but also ensure the longevity of your project. Start by choosing a clean, dry surface; making sure to remove any dust, grease, or old finishes will allow the adhesive to bond seamlessly with the wood and parchment.
When it comes to adhesives, consider using a high-quality decoupage medium or craft glue designed specifically for paper applications. Spread the adhesive evenly with a brush to avoid lumps and bubbles, which can compromise both the look and feel of your piece. Remember, using a thin layer is key-too much can lead to unsightly wrinkles or uneven finishes. Once applied, gently lay your parchment onto the surface, smoothing it out from the center outwards to eliminate air pockets. A brayer or a clean, dry cloth works wonders for this step, lending a professional touch to your creation.
After applying the parchment, sealing the project with a protective finish is essential. A matte or satin sealer will help prevent damage from moisture and scratches, preserving the soft, inviting appearance that embodies the essence of cottage style. For the best results, apply the sealer in thin layers, allowing adequate drying time in between. This attention to detail not only enhances the beauty of your work but also ensures that the unique patterns and textures of the parchment shine through, adding depth to your decor.
Finally, embrace the charm of imperfections; they tell a story of craftsmanship and creativity. Should you encounter any mishaps, don’t fret-misting your surface lightly with water and gently scraping away the imperfection with a flexible spatula can help you achieve that coveted seamless finish. Each piece you create not only transforms your space but celebrates the joy and artistry of homemade decor, allowing your cottage to reflect warmth, comfort, and unique character.
How to Incorporate Patterns and Colors in Parchment
Incorporating patterns and colors into your parchment projects can transform ordinary furniture into extraordinary statement pieces, perfectly embodying that sought-after vintage cottage appeal. The key lies in selecting the right designs that resonate with your personal style while enhancing the cozy aesthetic typical of cottage living. Imagine infusing your space with soft florals, whimsical damasks, or rustic checks; these charming patterns can create an inviting atmosphere that reflects warmth and creativity.
To begin, consider using patterned parchment papers that complement your furniture’s existing colors. Look for hues inspired by nature – soft pastels, earthy tones, or rich jewel shades work beautifully. For example, if you’re working with a classic whitewashed table, a delicate floral pattern in muted colors can add a touch of rustic elegance. Alternatively, bold geometric patterns can energize a vintage sideboard, creating a stunning focal point that draws the eye. When layering colors, aim for a harmonious balance by mixing similar shades or opting for tonal variations that add depth without overwhelming the space.
Techniques for Adding Patterns and Colors
In applying these patterns, consider experimenting with different techniques to achieve unique effects. Decoupage is one popular method, allowing you to combine multiple patterns onto a single piece, layering them for a collage effect. Begin by cutting your parchment into various shapes that will overlap slightly when applied, creating a more organic feel. For a rustic finish, distressing the edges of your parchment before gluing can enhance the vintage look.
Additionally, why not blend your parchment work with painting? A light wash of color over the parchment or on the furniture itself can blend easily into your decor. For instance, if you use a patterned parchment, a soft wash of white or light green paint can create a cohesive look while emphasizing the intricate details of the designs.
By experimenting with these techniques, you not only personalize your furniture but also set the stage for a warm, inviting space that echoes the charm of cottage living. Each piece becomes a story, an expression of creativity, and an invitation for family and friends to gather, celebrating life’s simple joys together.
DIY Restoration: Combining Parchment with Other Techniques

Restoring vintage furniture can be a rewarding endeavor, especially when you combine the timeless charm of parchment with various creative techniques. Imagine transforming a tired old table or a beaten-down chair into a beautiful statement piece that breathes new life into your cottage decor. By layering parchment with other materials, you can create a unique blend that highlights the character of each item while adding a personal touch.
One effective method is to incorporate paint techniques alongside your parchment application. Start by giving the furniture a base coat in a soft, muted color, like dove gray or pale sage, which will enhance the parchment’s patterns. After the initial layer dries, add sections of patterned parchment that echo the hues of the underlying paint. This technique not only creates a cohesive look but also allows the original wood grain to peek through, offering a rustic and inviting feel. To add depth, consider using a wash – a diluted mix of paint applied over the parchment to soften its appearance and integrate it further into the piece.
Texture is another vital aspect to play with. Use textured materials such as burlap or lace underneath the parchment for added visual interest. This combination can create a multifaceted surface that not only looks stunning but also engages the senses. You might even consider a mixed media approach by adding buttons, lace trims, or natural elements like dried flowers around the edges of your parchment. This handmade quality resonates beautifully with the essence of cottage living, where every piece tells a story and reflects the hand of the maker.
To achieve a truly harmonious result, take time to assess how each element interacts within your piece. For example, if you’re applying parchment to a chair seat, consider how it complements the wood finish of the legs. Ensuring that the colors and textures work in tandem can elevate the overall aesthetic, making each piece not just a functional item, but a cherished part of your home. The joy of DIY restoration lies in experimenting and finding that perfect balance that resonates with your personal style and the comforting allure of cottage charm.
Maintaining and Caring for Parchment Furniture
Maintaining parchment furniture is essential for preserving its beauty and ensuring it stands the test of time, particularly in a cozy cottage setting. Just like the laughter shared over a homemade pie or the love poured into a hand-stitched quilt, the care you give to your furniture reflects the warmth of your home. Regular maintenance not only enhances its longevity but also keeps the charming allure alive, making each piece a treasured part of your living space.
To start, dust your parchment furniture regularly with a soft, dry cloth. This simple act helps to prevent the buildup of grime that can dull its finish. For deeper cleaning, gently wipe down the surface with a damp cloth followed by a dry one to ensure no moisture seeps into the materials, which could warp or damage them. It’s best to avoid using chemical cleaners, as they can compromise the delicate surface of the parchment. Instead, opt for natural solutions like a mixture of mild soap and water, applied sparingly.
- Protect from Direct Sunlight: Position your parchment pieces away from direct sunlight to prevent fading and drying out.
- Humidity Control: Keep the humidity levels in your home balanced. Too much moisture can lead to mold, while too little can cause the parchment to crack.
- Touch-Up Paint: If you notice any scratches or similar flaws, touch them up with a matching paint to help maintain your furniture’s appearance.
- Seal the Surface: Occasionally, consider applying a protective sealant specifically designed for parchment to enhance durability.
Lastly, don’t shy away from a little creativity when caring for your parchment furniture. Maybe tie fresh lavender around the legs of a table or place a hand-knit throw over the back of a chair. These touches not only beautify but also nurture the artisanal vibes that cottage living celebrates. By investing a little love and effort into maintaining your parchment furniture, you’re not just preserving an object; you’re cherishing the stories and moments that each piece holds. Celebrate its imperfections as part of its unique history, and let it continue to bring warmth and character to your home for years to come.
Inspiring Parchment Furniture Transformations
Transforming your furniture with parchment can be a delightful adventure, sparking creativity and infusing your space with a unique vintage charm. Imagine a once-forgotten dresser brought back to life, its surface adorned with parchment that exudes warmth and character, perfectly complementing the rustic aesthetic of a cozy cottage. With parchment, the possibilities are endless, allowing you to blend the old with the new, crafting pieces that speak to your personal style and the inviting atmosphere of your home.
One inspiring way to showcase this transformation is through the use of patterns. By applying parchment that features floral or geometric designs, you can breathe new life into a plain wooden table. Pair it with soft-hued cushions and a simple centerpiece of wildflowers, and you’ve created a perfect nook for evening tea or book reading. Not only does the parchment add a tactile element, but it also tells a story, inviting guests to trace their fingers over its surface while they enjoy the welcoming ambiance of your home.
Another captivating example lies in the fusion of old-world charm with modern functionality. Imagine a kitchen island reimagined-its edges softened by layers of parchment that give it a rustic yet sophisticated finish. By using a distressed parchment that mimics the look of aged leather, you can maintain the vintage appeal while ensuring durability for daily use. Adding elements such as antique kitchenware or a handmade cutting board ties the whole look together, creating a space that feels timeless yet refreshingly contemporary.
For those ready to embark on their own parchment furniture journey, consider these transformative techniques. Experiment with layering different shades and textures, or integrate parchment with other materials like reclaimed wood or soft fabrics. Let your creativity flow as you incorporate seasonal decor-think simple autumn leaves on a parchment surface during the fall or delicate snowflakes in winter. Your furniture can evolve, reflecting the seasons and your personal touch, making each piece not just a functional item but a vibrant narrative within your home.
Embrace the beauty of craftsmanship and storytelling as you embark on your parchment projects. This is not merely about decorating; it’s about creating spaces that exude warmth and invite shared moments, echoing the heart and soul of cottage living. In a world of mass production, your lovingly transformed furniture stands as a reminder of the joy of handmade beauty and the connections nurtured within your cherished home.
Exploring Alternatives to Traditional Parchment
Transforming your furniture doesn’t always have to rely on traditional parchment. Discovering imaginative alternatives can enhance your rustic decor-bringing not just charm, but also a unique flair that reflects your personality. From hand-painted finishes to textured fabrics, the world of creative furniture restoration is replete with options that can evoke the warmth of a cozy cottage while allowing you to infuse your own character into your projects.
One charming approach is using fabric treatments. Materials like burlap, linen, or even soft canvas can be effortlessly glued or stapled onto furniture surfaces to create a rustic appearance that is both inviting and sturdy. Consider upcycling old curtains or tablecloths with delightful patterns to cover the front of a dresser or side table. The tactile feel of fabric provides a different yet equally antique ambiance, perfect for a cottage vibe. Additionally, complementing these fabrics with stencils or stamps can add a personal touch that celebrates the stories of your family.
For those seeking a more artistic touch, decoupage offers a whimsical alternative. This technique allows you to personalize your furniture with beautiful images cut from magazines, wrapping paper, or even children’s artwork. By layering these visuals with a sealant, you can create stunning surfaces that not only captivate the eye but also tell a unique story-ideal for showcasing seasonal themes or treasured memories. Consider a vintage dresser decorated with a montage of botanical prints for an enchanting garden-like feeling in your living space.
Another excellent option is paint, particularly chalk paint. Known for its matte finish and ease of use, chalk paint comes in a variety of muted tones that fit gracefully into any vintage decor scheme. A pale sage or soft lavender can breathe life into tired furniture while allowing natural wood textures to peek through. For an inviting ambiance, don’t shy away from distressing your painted surfaces just a bit; this technique adds depth and a well-loved patina that resonates with the history of cottage living.
Embrace your creativity by experimenting with these alternatives and gathering inspiration from your surroundings. The process of revamping furniture should be as delightful and cozy as the finished product. Each piece you transform is not just a statement of style; it’s a reflection of your journey, bringing warmth and connection to your home.
Q&A
Q: What is the best type of parchment for vintage furniture applications?
A: The best type of parchment for vintage furniture applications is heavy-weight parchment paper that mimics the look of aged leather. This type is durable and adds a rustic charm, ensuring a lasting appeal that blends seamlessly with vintage cottage décor.
Q: How do I prepare furniture before applying parchment?
A: Always clean the furniture thoroughly before applying parchment. Sand any rough spots gently and remove dust to ensure a smooth application. Prepping your furniture enhances adhesion and helps achieve the desired vintage look.
Q: Can I use parchment on previously painted furniture?
A: Yes, you can use parchment on previously painted furniture. Just ensure that the paint is clean and dry, and use a primer if necessary to improve adhesion. This technique can create a beautiful contrast between the parchment and the underlying paint.
Q: What are some creative designs to consider when using parchment?
A: Consider using distressed finishes, floral patterns, or subtle textures to enhance your vintage cottage appeal. You can also layer multiple parchment styles for a more eclectic design, which adds depth and visual interest to your furniture.
Q: How can I maintain parchment furniture?
A: Maintain parchment furniture by using a soft, dry cloth for cleaning. Avoid harsh chemicals and excess moisture, as these can damage the parchment. Regularly check for signs of wear and touch up with adhesive if necessary to keep your furniture looking fresh.
Q: Is it possible to remove parchment from furniture?
A: Yes, it is possible to remove parchment from furniture, but it requires careful peeling to avoid damaging the surface underneath. Using a heat source, such as a hairdryer, can help loosen the adhesive, making the process easier.
Q: How long does parchment last once applied?
A: Once applied properly, parchment can last several years, depending on usage and care. Ensure adequate protection against moisture and heavy wear to prolong its life, maintaining the vintage charm of your furniture in the long run.
Q: What tools are essential for working with parchment on furniture?
A: Essential tools include a craft knife, adhesive (like Mod Podge), a paintbrush for application, and a smoothing tool to remove air bubbles. Investing in quality tools will make the process easier and ensure a professional finish for your vintage furniture project.
Final Thoughts
You’ve unlocked the rustic charm of applying parchment to your furniture, transforming it into a cozy cottage masterpiece. Remember, the right technique not only enhances aesthetics but also showcases your unique style and commitment to handcrafted beauty. Don’t wait-dive into your DIY project today and let your creativity flourish!
If you found this guide helpful, explore our articles on seasonal gardening tips and DIY decor projects to further enrich your cottage lifestyle. Have questions or want to share your experience? Leave a comment below or connect with our community! For more inspiring content on decorative techniques and farmhouse recipes, sign up for our newsletter and never miss a cozy moment. Embrace the warmth of cottage living, and keep the creativity flowing!