Transforming your kitchen or furniture can breathe new life into any space, and using Valspar Cabinet and Furniture Paint is a delightful way to achieve professional results with a DIY spirit. Whether you’re seeking to elevate a cherished piece or create a stunning centerpiece, understanding the right techniques and products can make all the difference. With its rich hues and durable finish, Valspar paint not only enhances aesthetics but also reflects your personal style-perfect for creating that cozy cottage feel. Join us as we explore step-by-step guidance that empowers your creativity, ensuring each brushstroke adds warmth and character to your home. Embrace the joy of handcrafted beauty and let’s embark on this inspiring journey together, turning your visions into reality!
Choosing the Right Valspar Paint for Your Project
Whether you’re sprucing up a tired cabinet or transforming a beloved piece of furniture, choosing the right paint can set the tone for your entire project. Valspar offers a wide range of options that cater to diverse styles and needs, making it an ideal choice for your next creative endeavor. The quality of Valspar paint ensures that your efforts will not only look beautiful but will also stand the test of time. With an array of colors and finishes, from soft pastels to bold hues, Valspar paints can help you achieve that cozy cottage feel or a more rustic aesthetic tailored to your home.
When selecting Valspar paint, consider the specific requirements of your project. For cabinets, products like the Valspar® Cabinet and Furniture Paint provide durability and a smooth finish, essential for surfaces that experience frequent use. If you’re working on furniture that may be exposed to high wear, opting for a paint with a satin or semi-gloss finish can offer added protection and make cleaning a breeze. Additionally, Valspar’s range includes low-VOC options, making it a sensible choice for those seeking to maintain indoor air quality while revitalizing their space.
To further assist in your selection, Valspar provides a handy color visualizer tool on their website. This intuitive tool allows you to see how different colors will look in your space, making it easier to visualize your artistic vision before you start painting. From warm greys that evoke a sense of calm to vibrant greens that breathe life into your surroundings, the possibilities are delightful. Armed with this information, you can embark on your painting project with confidence, knowing that your choice of Valspar paint will complement your rustic style and enhance the charm of your home. Let the fun of creating something beautiful begin!
Essential Preparations for Painting Cabinets
Every beautiful transformation begins with a little bit of planning and careful preparation. Before diving into your cabinet painting project, it’s essential to recognize that the secret to a stunning, long-lasting finish lies in the groundwork you lay down. Setting the stage right ensures that your cabinets not only look appealing but also stand up to the wears and tears of daily life. As you prepare, think of it as creating a cozy, welcoming atmosphere-much like preparing your home for a gathering with friends.
To start, you’ll want to choose a suitable workspace. If possible, take your cabinets outside or into a well-ventilated area. Cover the surrounding surfaces with drop cloths to protect them from any paint splatters. Next, remove any hardware such as knobs, handles, and hinges. Doing so not only allows for a cleaner look after painting but also prevents accidental spills on these oft-used decorations. Once that’s done, give the surfaces a thorough cleaning using a mixture of warm soapy water to eliminate grease and grime. This is crucial because any contaminants left behind can mar the finish of your beautiful work.
Once the surfaces are clean and dry, assess the condition of your cabinets. If they’re worn or chipped, sanding might be necessary to create a smooth surface. use medium-grit sandpaper to gently buff the surfaces, followed by a finer grit that will leave them feeling silky and ready for paint. Remember to wipe away any dust with a damp cloth afterward to ensure the paint adheres properly.
Lastly, consider the primer. Using a high-quality primer designed for cabinets can significantly enhance the durability and finish of your paint. While Valspar’s Cabinet and Furniture Paint often offers great coverage on its own, priming can create an even more robust foundation, especially if you’re transitioning from a dark shade to a lighter one. With careful preparations like these, you’re not just painting cabinets; you’re breathing new life into your cherished spaces, setting the stage for a rustic, charming atmosphere that reflects your love for cozy cottage aesthetics.
Embrace the process, enjoy the journey, and soon you’ll find yourself looking forward to the magical transformation these cabinets will undergo!
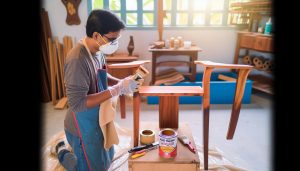
Step-by-Step Guide to Painting Furniture
Transforming a piece of furniture can breathe new life into your space, creating a cozy atmosphere filled with handcrafted beauty. When painting with Valspar Cabinet and Furniture Paint, the process can be both rewarding and delightful, reminding us of the joys of cottage living, where every brushstroke contributes to a welcoming home. Let’s take a scenic path through the step-by-step guide that will lead you to achieve stunning results.
Start with a clean slate. Before applying that first stroke of paint, ensure your furniture piece is free of dust and grime. A good wash with warm, soapy water followed by a rinse is ideal. If you’re dealing with old surfaces, consider taking a fine-grit sandpaper to smooth out any imperfections. This not only prepares the surface for painting but also allows the paint to adhere better, ensuring a durable finish that can withstand daily life.
Next comes the magic of priming. For the best results, apply a high-quality primer suited for your chosen material. This step is particularly crucial when you’re making significant color changes or working with challenging surfaces like laminated furniture. A good primer will provide a solid foundation and can enhance the paint’s vibrancy. Once the primer has dried completely, you’ll want to approach the furniture painting itself.
Using a quality paintbrush or a foam roller, apply the Valspar paint in thin, even layers. This technique reduces the likelihood of drips and ensures a smoother finish. Allow each coat to dry thoroughly – you might be tempted to rush this step, but patience pays off. Depending on the richness of the color and the surface, you may need two or three coats.
After you’ve achieved the desired finish, it’s time to consider the final touches. Adding a clear protective finish can not only enhance the depth of color but also add that layer of durability for a piece that endures through seasons of life. Embracing this journey of painting furniture is more than just a project; it’s an expression of creativity that resonates with the heartwarming spirit of cottage living.
Top Tools and Supplies for Pro Results
When embarking on a creative journey to revitalize your cabinets and furniture, the right tools and supplies can make all the difference. Think of this as gathering your favorite ingredients before whipping up a beloved family recipe; each item plays a crucial role in crafting not just a fresh look, but also a durable finish that speaks to the warmth of cottage living. As you step into your DIY project, consider equipping yourself with some essential items that will help you achieve professional results while celebrating the joy of handcrafted beauty.
Start with quality paintbrushes and rollers, as they are the heart and soul of your painting process. Natural bristle brushes are ideal for oil-based paints, while synthetic brushes work wonders with water-based Valspar paints. Foam rollers are excellent for covering large areas quickly and ensuring a smooth application. Additionally, having brushes in various sizes will allow you to reach tight corners and intricate details with grace and ease.
Next, don’t forget the primer-a step that lays a solid foundation for your paint. Depending on your furniture’s material, choose a high-quality primer that suits your needs. For wooden furniture, an oil-based primer can provide excellent adhesion, while latex options can work beautifully on laminate surfaces, enhancing color vibrancy. Remember, a well-primed surface is akin to a prepared canvas for a painter; it allows colors to shine.
To ensure a clean workspace, gather some drop cloths and painters’ tape. Protecting your floors and surrounding areas should be a top priority, especially when you’re transforming a beloved heirloom or a thrifty find. High-quality painters’ tape helps you create sharp, crisp lines, resulting in a polished look reminiscent of professional craftsmanship.
Finally, after your masterpiece is complete, consider the longevity of your efforts by investing in a protective finish. Clear sealers or varnishes can not only enhance the luster of your paint but also provide a durable barrier against wear and tear. Choose matte for a rustic charm or gloss for a sleek, modern touch.
With this collection of tools and supplies in hand, you’re well on your way to completing a project that encapsulates the cozy spirit of cottage living. Each stroke of paint is more than just a practical task; it’s an expression of your creativity and love for your home. So roll up those sleeves, let your imagination flow, and enjoy the delightful process of transforming your furniture into pieces that reflect your unique style and heartwarming hospitality.
Techniques for a Smooth, Flawless Finish
Creating a smooth, flawless finish when applying Valspar Cabinet and Furniture Paint can transform a simple project into a stunning showcase of your creativity. Whether you’re breathing new life into an old cabinet or giving a quaint piece of furniture a chic upgrade, certain techniques can elevate your results. The key is to embrace the craft with patience and attention to detail, much like an artisan who carefully carves each piece to perfection.
Start by applying your Valspar paint in thin, even coats. This approach not only ensures that the paint adheres well but also minimizes the risk of drips and brush marks that can mar your finish. Use a high-quality brush or roller to achieve this. For larger flat surfaces, a foam roller is a treasure, delivering that beautifully smooth application. Meanwhile, a natural bristle brush works wonders for intricate corners and edges, where finesse is essential. Apply your first coat and allow it to dry completely as per the manufacturer’s guidelines-aim for a cozy timeframe of at least two hours to allow the paint to settle.
Sand Between Coats
To achieve maximal smoothness, don’t skip the magic of light sanding between coats. Once your first coat is dry, take a fine-grit sanding block (about 220 grit). Gently sand the surface in a circular motion to create a ‘tooth’ for the next coat to adhere to, which can significantly reduce imperfections. Remember to wipe down the surface with a lint-free cloth afterward to remove any dust. Repeat this process for subsequent coats-you’ll find that each layer builds upon the last, like crafting a sumptuous layer cake.
If you’re working with Valspar’s chalk or satin finishes, consider using a paint additive to further enhance flow and reduce brush marks. Pouring in a few drops of a paint conditioner can improve the paint’s texture, making it glide on beautifully. Don’t be in haste; let each layer breathe and decide when it’s ready for the next. Proper drying and curing allow your masterpiece to achieve its full potential.
As the finishing touches come together, take a step back and cherish the transformation. Your newly painted surfaces not only reflect a dedication to craftsmanship but also add character to your cottage-style living. Each brushstroke tells a story, a testament to your creativity and the beauty of homemade decor. So enjoy the process, embrace the imperfections along the way, and behold the beauty of your cozy, handcrafted spaces.
Common Mistakes to Avoid When Painting
The path to a beautifully painted cabinet or piece of furniture is often paved with excitement and creativity, but it’s essential to navigate this journey with care to avoid common pitfalls. Enthusiasm is wonderful, yet rushing through any painting project can lead to unintentional blunders that might detract from your handcrafted masterpiece. By being aware of some typical mistakes, you can foster your cozy cottage aesthetic with confidence and flair.
One of the most frequent missteps is skipping the preparation process. Properly cleaning your surfaces is integral, as dirt and grease can prevent paint adhesion and lead to an uneven finish. Take the time to wipe down your furniture with a mild cleanser and ensure it’s completely dry before getting started. Additionally, neglecting to prime your piece, especially if it’s made of raw wood or a darker color, can result in a less vibrant final hue. Primer acts as a foundation that enhances paint coverage, ultimately allowing your chosen Valspar color to shine with its full vibrancy.
Another common error is applying paint too thickly in one coat rather than layering it with thin, even strokes. Thick application can lead to drips, uneven texture, and prolonged drying times. Think of painting as a delicious recipe: just as you wouldn’t dump all ingredients in at once, your paint should be layered delicately to allow for a beautiful, smooth finish. Opt for a high-quality brush or roller, and remember to embrace the beauty of lighter coats-about two to three will achieve stunning results with your Valspar paint.
It’s also crucial to avoid painting in overly humid or cold conditions. Environmental factors play a significant role in how paint dries and adheres, and for optimal results, aim for a temperature of around 70°F (21°C) and moderate humidity. Painting under these conditions will help to ensure that your artful strokes dry evenly and maintain their charm. Lastly, don’t forget to take your time and allow each coat to dry fully before applying the next. Patience in crafting your creation will yield richer rewards, allowing every brushstroke to speak of your dedication to a delightful, rustic home aesthetic.
Embrace the adventure of painting with these insights in mind, and you’ll find that each mistake avoided is a step closer to crafting a beloved piece that will tell your story for years to come. Remember, the journey of transformation is just as fulfilling as the finished product!
Tips for Drying and Curing Your Paint
When it comes to achieving a stunning finish on your cabinets and furniture, the drying and curing process is just as important as the application itself. Proper drying allows each layer of Valspar paint to settle beautifully, setting the stage for the vibrant colors and flawless surfaces that will transform your space. Just as a freshly baked pie needs time to cool before serving, your painted pieces deserve the same tender care to ensure long-lasting beauty.
To start, patience plays a significant role in drying and curing. After applying each coat of paint, allow ample time for it to dry before adding another layer. For most Valspar paints, this means waiting about one to two hours, depending on the humidity and temperature in your environment. That said, longer drying times might be needed in cooler or more humid conditions, as moisture can prolong the curing process. A good tip is to touch the paint lightly with your fingertip; if it feels tacky, it needs a bit more time to set.
Creating an Ideal Drying Environment
As you embark on your painting journey, consider the environment in which your pieces will dry. Ideally, you want to place them in a space that is well-ventilated, with a temperature around 70°F (21°C). Open windows to create a gentle airflow, and use fans to help circulate the air without blowing dust onto your damp surfaces. If you’re facing cooler temperatures, be mindful not to move your projects to overly warm environments like near heaters, as rapid drying can lead to cracking or uneven finishes.
To further enhance your drying process, a dehumidifier can be a great ally in especially muggy areas or months. Keeping the humidity in check will help your paint cure evenly, preventing swelling or warping of the wood beneath.
Additional Curing Tips
Once the paint has dried sufficiently, it’s time to think about curing. Curing is the process by which the paint hardens completely and adheres thoroughly to the surface beneath. Valspar paints are often designed for faster curing, but it’s recommended to wait at least several days before subjecting your newly painted furniture to heavy use. During this time, avoid placing items on the surfaces or leaning against them, as they need this time to adhere and stabilize fully.
- For optimum results, consider avoiding heavy cleaning or using chemical cleaners for at least 30 days. This allows the paint to harden without disruption.
- Protect your painted surfaces with felt pads under decorative items to minimize wear.
- If you plan to use the furniture soon, opt for lightweight decor until it is fully cured.
By committing to these drying and curing steps, your handcrafted treasures will not only look exquisite but will also endure the test of time, preserving the cozy charm of your cottage-themed home for years to come. Remember, each piece holds a story waiting to be told, so nurture it as it takes shape and enjoy the beauty of your creative endeavor!
Adding Protective Finishes for Longevity
To extend the life of your beautifully painted cabinets and furniture, incorporating protective finishes is essential. While Valspar paint offers a robust foundation with its vibrant colors and durable formula, a thoughtful layer of protection can further enhance longevity and maintain that freshly painted look. Think of it as a cozy quilt wrapped around your favorite chair, adding warmth and safeguarding against wear while embracing rustic charm.
Choosing the right protective finish can be likened to selecting a well-loved piece for your cottage home-each serves a purpose and complements your style. Consider using a clear topcoat or sealer, ideally formulated for furniture, as it will create a barrier against scratches, moisture, and even the occasional spilled drink. Here are a few options to explore:
- Polyurethane: Available in both water-based and oil-based formulations, polyurethane provides excellent durability. Water-based versions are less yellowing, making them ideal for keeping white or pastel colors fresh, while oil-based versions offer a rich depth to darker shades.
- Varnish: This versatile choice creates a strong, protective layer and can be found in various finishes ranging from matte to gloss. It’s perfect for pieces that receive daily use, such as dining tables or coffee tables.
- Wax: For a softer finish, consider a high-quality furniture wax. It adds a lovely sheen and is easy to apply and reapply over time. However, note that wax might require more frequent touch-ups compared to other finishes, especially on surfaces subject to heavy use.
Applying these protective finishes is a straightforward process but requires care and precision. After allowing your Valspar paint to fully cure, lightly sand the surface with a fine-grit sandpaper to ensure good adhesion. Wipe away any dust with a damp cloth, then apply your chosen finish using a high-quality brush or foam applicator for an even coat. It’s advisable to work in thin layers, allowing adequate drying time between each application; two to three coats should be sufficient for optimal protection.
Moreover, embracing these protective measures not only preserves the beauty of your furniture but also enhances the character of your home. Picture the joy of gathering with family around that perfectly painted dining table, knowing you’ve safeguarded its beauty for years to come. In rustic living, we celebrate the stories each piece tells, and with a little extra attention, your handcrafted treasures will continue to shine, inviting warmth and creativity into your cottage-inspired lifestyle.
Creative Ideas for Customized Cabinet Designs
Transforming your cabinets into personalized masterpieces is a delightful way to infuse character and warmth into your home. With Valspar’s array of rich and vibrant colors, you can truly make a statement while enhancing the rustic charm that cottage living embodies. Whether you’re aiming for a cozy farmhouse feel or a more modern twist, customizing your cabinets can breathe new life into your space.
Begin by choosing colors that resonate with your home’s existing palette. Consider a soft sage green or a mellow butter yellow for a sweet, inviting atmosphere. If you’re feeling adventurous, try a two-tone approach: paint the upper cabinets a lighter shade to brighten the space while opting for a deeper hue on the lower cabinets to ground the design. This contrast not only creates visual interest but also adds an unexpected flair to your kitchen or living area.
Another fun way to customize your cabinets is by incorporating stenciling or intricate hand-painted designs. For example, you might stencil delicate floral patterns along the borders or paint charming motifs that reflect your personal interests, such as nature or local wildlife. This artistic touch gives your cabinets a unique identity that tells a story of your home and the life within it.
For added texture and charm, consider distressing techniques or using a milk paint blend for a weathered finish. This is particularly suitable for achieving that treasured antique look as though your cabinets have been part of your family’s history. Using Valspar’s paints, you can easily replicate worn edges and subtle imperfections that enhance the rustic aesthetic, making your space feel both cozy and timeless.
By engaging in these creative projects, you not only personalize your cabinets but also create a welcoming environment that celebrates handmade beauty. It’s not just about functionality; it’s about crafting a home where every brushstroke resonates with warmth, creativity, and the fulfilled joy of cottage living. Now, take a step back, savor your work, and imagine the stories your newly transformed cabinets will share with every family gathering or quiet moment spent in your cherished space.
How to Maintain Your Newly Painted Surfaces
To keep your newly painted surfaces looking fresh and vibrant, a consistent maintenance routine is essential. Just like tending to a beautiful garden, caring for your painted cabinets and furniture ensures they continue to bring warmth and charm to your cottage living spaces. Regular upkeep not only preserves the aesthetic appeal of your hard work but also enhances the durability of Valspar paint, allowing you to enjoy your handcrafted beauty for years to come.
Start with gentle cleaning to avoid damaging the finish. Use a soft, damp cloth dipped in warm soapy water to wipe down surfaces, ensuring that you avoid abrasive pads that could scratch the paint. For tougher stains or spills, a mild vinegar solution can work wonders, breaking down grime without harsh chemicals. Remember, always test any cleaning solution on a small, inconspicuous area first to make sure it won’t affect the color or finish.
Touch-ups and Repairs
Over time, even the most carefully maintained surfaces may require some touch-ups. Keeping a small sample of your original Valspar paint on hand makes it easy to quickly address any nicks or scratches that may occur. Simply clean the affected area, allow it to dry, and carefully apply a touch of paint using a fine brush for precision. This simple act can seamlessly restore the luster of your painted surfaces, ensuring they remain as inviting as the day you finished your project.
Protective Care
Consider adding protective layers to your furniture and cabinets to prevent wear and tear. Clear coats, especially those designed for painted surfaces, can provide an extra shield against scratches and stains. Look for water-based options that won’t yellow over time, keeping your colors looking as bright as a sunny afternoon. For surfaces that see high traffic, such as kitchen cabinets, these added protections can be particularly beneficial.
In the spirit of community and creativity, share your methods and discoveries with fellow DIY enthusiasts. Whether through a local crafting group or social media, your tips on maintaining painted surfaces can inspire others to cherish their own handmade creations. By fostering a sense of connection, we not only celebrate the joy of unique, handcrafted beauty but also encourage simple, rustic living that breathes character into every heartwarming home.
Transforming Your Space: Before and After Stories
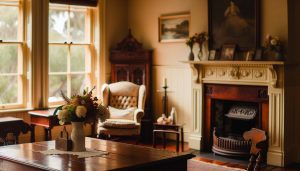
There’s something magical about witnessing the transformation of a space, especially when it involves the gentle touch of paint. Many DIY enthusiasts and homeowners have found that applying Valspar paint to their cabinets and furniture not only enhances the aesthetics of their spaces but also breathes new life into cherished pieces. Picture a once-dull kitchen filled with dark wood cabinets that has been rejuvenated into a bright, cheerful heart of the home with a fresh coat of soft white or pastel hue from Valspar’s extensive color palette.
One heartwarming story comes from a couple in a quaint cottage who decided to tackle their aging kitchen. Armed with Valspar’s chalky finish paint, they transformed their worn oak cabinets into a stunning whitewashed masterpiece that brightened their entire kitchen. The new finish not only modernized the space but also highlighted their unique collection of vintage dishware, making it feel both cozy and inviting. These real-life transformations showcase how a simple can of paint can create a profound impact, turning a space that felt cramped and uninviting into one filled with warmth and charm.
Community Inspirations
As word spreads, more people are sharing their before-and-after stories, forming a vibrant community that celebrates crafted beauty through the humble act of painting. Online forums and social media platforms become showcases for these remarkable transformations-whether it’s a side table turned into a focal point with a bold color, or a dresser reimagined with a soothing hue. By sharing photos of their projects, homeowners inspire one another, fostering a sense of connection and creativity that embodies the spirit of cottage living.
Practically speaking, the process often involves a few essential steps to ensure stunning results: start with proper surface preparation, choose the ideal Valspar paint finish for your desired effect, and allow ample drying time for a flawless finish. With these techniques in mind, individuals can confidently embark on their own projects, creating inviting spaces that reflect their personality and lifestyle.
Embrace the joy of transformation and discover the endless possibilities that lie within your walls. Whether you’re reviving an old piece or giving a whole room a facelift, the satisfaction of a job well done and the warmth it brings to your home can truly be one of life’s simple pleasures.
Q&A
Q: What surface preparations are essential for using Valspar Cabinet and Furniture Paint?
A: Proper surface preparation is crucial. Start by cleaning surfaces to remove dirt and grease, then sand lightly for better paint adhesion. Primer application may also be required on bare wood or stained surfaces. Refer to the “Essential Preparations for Painting Cabinets” section for detailed steps.
Q: How can I achieve a professional finish with Valspar paint?
A: Achieving a professional finish involves using quality tools, applying thin coats, and sanding between layers. Always follow the manufacturer’s instructions on drying times and techniques. Consult the “Techniques for a Smooth, Flawless Finish” section for expert tips.
Q: Can I use Valspar furniture paint on kitchen cabinets?
A: Yes, Valspar Cabinet and Furniture Paint is designed specifically for kitchen cabinets, offering durability and a long-lasting finish. Ensure to follow the preparation and application guidelines to achieve the best results. See “Choosing the Right Valspar Paint for Your Project” for more insights.
Q: What is the best way to fix drips and runs in Valspar paint?
A: To fix drips and runs, allow the paint to dry completely, then lightly sand the area with fine-grit sandpaper. Apply touch-up paint once smoothed out. This is a key point covered in the “Common Mistakes to Avoid When Painting” section.
Q: How long does it take for Valspar paint to dry completely?
A: Valspar paint typically dries to the touch within 1-2 hours, but for best results, allow it to cure for at least 24 hours before heavy use. Refer to “Tips for Drying and Curing Your Paint” for more specifics.
Q: What protective finishes can I add for durability after painting?
A: To enhance durability, consider applying a clear topcoat or polyurethane finish once the paint has fully cured. This will protect against scratches and stains. Explore the “Adding Protective Finishes for Longevity” section for detailed recommendations.
Q: How do I maintain my painted cabinets over time?
A: Regularly dust your painted surfaces with a soft cloth and avoid abrasive cleaners. For deeper cleaning, use a mild soap solution. Maintenance tips can be found in the “How to Maintain Your Newly Painted Surfaces” section.
Q: What are common color choices for Valspar cabinet and furniture paint?
A: Popular color choices include neutral tones like soft greys and whites, as well as bold colors for a statement look. Exploring the latest color trends can help you select the perfect shade to complement your decor. Check the “Creative Ideas for Customized Cabinet Designs” section for inspiration.
Insights and Conclusions
Congratulations on transforming your spaces with Valspar Cabinet and Furniture Paint! You’ve learned the essential steps to achieve professional results, showcasing the beauty of your home while embracing a cozy cottage vibe. Don’t let your creativity stop here-explore our guide on DIY Rustic Decor Projects to inspire even more projects, or check out our tips on Seasonal Gardening to complement your freshly painted cabinets with vibrant plants.
If you have questions or want to share your painting experience, please leave a comment below! For more resources to enhance your home, consider signing up for our newsletter. Join our community of passionate creators and get inspired with our latest articles on farmhouse recipes and architectural features. Your cozy haven awaits-dive into the rewarding journey of rustic living!