Have you ever wondered if that trusty bottle of Windex could play a role in your next slime-making adventure? The answer might surprise you! In the world of DIY science experiments at home, the chemistry behind slime is as fascinating as it is fun. Many families are looking for engaging activities that spark creativity and curiosity, making slime a perfect project. Not only does this colorful concoction provide hours of sensory play, but experimenting with different ingredients, like Windex, can lead to unique textures and properties. Join us as we explore how Windex can activate slime and uncover the science that makes this delightfully gooey creation come to life. Whether you’re a seasoned crafter or just starting out, you’ll find joy in the simple, homemade magic that connects us all. So roll up your sleeves, and let’s dive into the squishy, slushy world of slime-making together!
Can Windex Activate Slime? Understanding the Science Behind It
It’s a curious question many parents and young scientists ask: can a common household cleaner like Windex actually activate slime? The answer lies within the chemistry of both slime and the ingredients found in Windex. Slime is typically made from a combination of glue and an activator, such as borax or liquid starch, which creates the signature stretchy texture. Windex, on the other hand, primarily contains ammonia and water, along with other cleaning agents.
When you add Windex to your slime mixture, the ammonia in Windex can interact with the glue’s polymer chains, potentially leading to a reaction that changes the slime’s consistency. In practice, some users have reported that Windex can serve as an effective activator, providing a unique texture and flexibility in the finished product. However, it’s essential to note that results can vary based on the specific type of glue and the proportions used.
To explore this hypothesis, you might want to conduct a simple experiment. Begin by mixing your glue and water to create a basic slime base before adding small amounts of Windex. Observe the changes in texture and consistency as you experiment with different quantities. This hands-on approach not only satisfies curiosity but also sets the stage for deeper learning about chemical reactions and the properties of matter. As you navigate this slime-making adventure, you’ll find that the beauty of science lies in experimentation and discovery-much like the joys of a cozy cottage filled with creativity and rustic charm.
So gather your ingredients and invite your little ones to partake in this fun science experiment, fostering not just play but also a love for learning and exploration within your warm and welcoming home.
The Chemistry of Slime Activation: Key Ingredients Explained
Creating slime is an enchanting process that combines science and creativity, making it a delightful activity for families. At the heart of this fascinating concoction are the essential ingredients: glue, activators, and, interestingly, products like Windex. Understanding how these ingredients interact helps demystify the transformation from simple materials into stretchy, squishy fun.
The primary component of most slimes is polyvinyl acetate (PVA), the main ingredient in white school glue. When you introduce an activator-like borax, baking soda, or even Windex-you initiate a chemical reaction that cross-links the polymer chains in the glue. This change is what gives slime its unique texture. In the case of Windex, which contains ammonia and water, these components work to alter the viscosity of the glue, allowing for a different consistency. The ammonia reacts with the PVA, enhancing the slime’s stretchiness and pliability, resulting in a fun, squishy product that varies by the type of glue used and the quantity of Windex added.
Experimentation is key in this process. Each batch of slime can yield different results based on specific environmental factors and proportions. To create your masterpiece, try mixing a few tablespoons of glue with a splash of Windex. Observe the transformation as you slowly incorporate more activator until you achieve your desired texture. This engaging scientific method not only sparks curiosity but also encourages discussions about the underlying chemical processes involved in creating something entirely new from basic materials.
As you gather your supplies and inspire your young scientists, remember that the magic of slime-making lies in both the experimentation and the joy of creation. Embrace the mess, celebrate each unique batch, and cherish the moments spent together in your cozy cottage, where science and art beautifully intertwine!
Exploring the Best Household Alternatives to Windex
Creating slime is a delightful act of experimentation, and while Windex has earned its place as a common activator, a rustic home filled with creativity often calls for alternative solutions right from your pantry or garden. Embracing the charm of cottage living, we can find joy in simplicity and resourcefulness, especially when it comes to crafting with children.
There are several household items that can effectively substitute for Windex in your slime-making adventures. One of the most popular options is baking soda mixed with a little water. This ingredient not only activates the glue but also adds a unique texture that can make your slime even more satisfying to stretch and squish. Simply combine a tablespoon of baking soda with a few tablespoons of water, then incorporate it with your glue until the desired consistency is reached.
Another fantastic alternative is contact lens solution, which contains a mix of boric acid and sodium borate. These are excellent for creating the perfect slime texture. If you don’t have contact lens solution, consider using vinegar. While its activation properties are slightly different, when combined with baking soda, it creates a fizzy reaction that’s both fun to watch and a genuine part of the slime-making process. The acidity of vinegar, coupled with baking soda, can yield a thick and gooey slime, perfect for little hands eager to play.
Don’t overlook the charm of cornstarch mixed with water-a classic recipe known as oobleck. This fluffy, cloud-like texture can bring an entirely different sensory experience to your slime collection. Simply mix equal parts of cornstarch and water; although it has a different consistency than traditional slime, it’s equally delightful for interactive play.
These alternatives not only heighten the creativity and joy of making slime but also deepen family connections as everyone participates in the process. Each ingredient brings its own magic and uniqueness to the final product, echoing the beauty of cottage living, where every creation tells a story. So gather your supplies, let your imaginations run wild, and enjoy the delightful mess of crafting together in your cozy space.
Step-by-Step Guide: Making Your Own Slime at Home
Creating slime at home is not only a fun activity but also a delightful way to engage with science, turning your kitchen into a laboratory of creativity. With just a few simple ingredients, you can craft a gooey masterpiece that sparks joy and experimentation. This guide provides an easy, step-by-step process for making your own slime, highlighting the flexible nature of homemade creations-perfect for cozy cottage living.
Start by gathering your materials. You’ll need white school glue (about 1 cup), water (1/2 cup), an activator (choose from baking soda or contact lens solution), and optionally, food coloring for that personalized touch. Have a bowl, stirring utensil, and measuring cups ready to go for a smooth slime-making experience.
- Mix the Glue and Water: In a bowl, combine the white school glue with the water. This will create a base that’s both stretchy and delightful. Stir until the mixture is uniform and free of lumps.
- Add Your Activator: If you’re using baking soda, add about 1 tablespoon to the glue mixture and stir until dissolved. Gradually, you’ll want to add your contact lens solution (if using) starting with 1-2 tablespoons. The slime will begin to form as you stir; it may take a bit of patience to achieve the right consistency. Keep mixing until you notice the slime pulling away from the sides of the bowl.
- Customize with Color: If you’d like to add a bit of flair, squeeze in a few drops of food coloring. This step allows you to tailor the color to match your home or seasonal decor, celebrating the charm of rustic living.
- Knead the Slime: Once the mixture holds together, take it out of the bowl and knead it with your hands for several minutes. This is where the magic happens! Kneading will enhance the texture, making it soft and stretchy. Feel free to sprinkle with glitter or sprinkle in fragrant essential oils if you’d like to elevate the sensory experience even further.
- Storage: To keep your slime fresh for future use, store it in an airtight container. This practice will not only preserve your creation but also help maintain that sticky, stretchy consistency.
When making slime, it’s essential to embrace the process while enjoying messy hands, colorful creations, and shared laughter with loved ones. Each batch of slime you make is an opportunity to explore chemistry, texture, and a sense of achievement, reminding you of the beauty of simplicity and craftsmanship in a cozy home setting. Gather your family, create your own recipes, and embark on a crafting adventure that will keep everyone engaged, inspired, and connected.
Fun Variations: Adding Colors and Scents to Your Slime
Engaging in the world of slime-making opens up a rainbow of possibilities, not just in texture but also in color and scent! Adding vibrant hues and delightful fragrances can transform your slime from a simple experiment into a sensory experience that captivates the imagination. Embracing the joys of creativity is at the heart of cottage living, where simple activities turn into cherished memories.
You can easily customize your slime with various colorants. Food coloring is a popular choice, allowing you to create any shade you desire. A few drops can change your slime from a neutral base to a striking blue, a soft pink, or even a festive green, perfect for seasonal themes or holiday gatherings. For an added layer of charm, consider using natural colorants like beet juice or turmeric. These not only enhance the visual appeal but also add an element of eco-friendliness, aligning with a rustic and sustainable lifestyle.
Fragrance is another magical element to consider. Imagine the joy of making your slime smell like fresh lavender or zesty citrus! Adding a few drops of essential oils can create a soothing or invigorating experience, making your slime not just fun to play with but also a delightful sensory treat. For a sweeter aroma, try using extracts such as vanilla or almond, which can make your crafting session feel like a cozy bake-off. Remember to use these additives sparingly; start with a few drops and adjust according to your preference.
Including accents, such as glitter or confetti, can also elevate your slime to new heights. Not only do these additions provide a dazzling visual effect, but they can also spark inspiration for creative play, such as having glimmering slime parties or themed slime crafts that reflect the seasons. Allowing children or friends to help choose their colors and scents fosters a sense of ownership and excitement in the slime-making journey.
As you embark on this colorful adventure, let the enchanting atmosphere of your cozy cottage inspire you to experiment boldly. Combining vibrant colors and fragrant scents not only enhances the slime-making experience but also nurtures creativity and togetherness-an essence of rustic living that brings joy to your home. So gather your materials, invite loved ones to join in, and let your imaginations run wild!
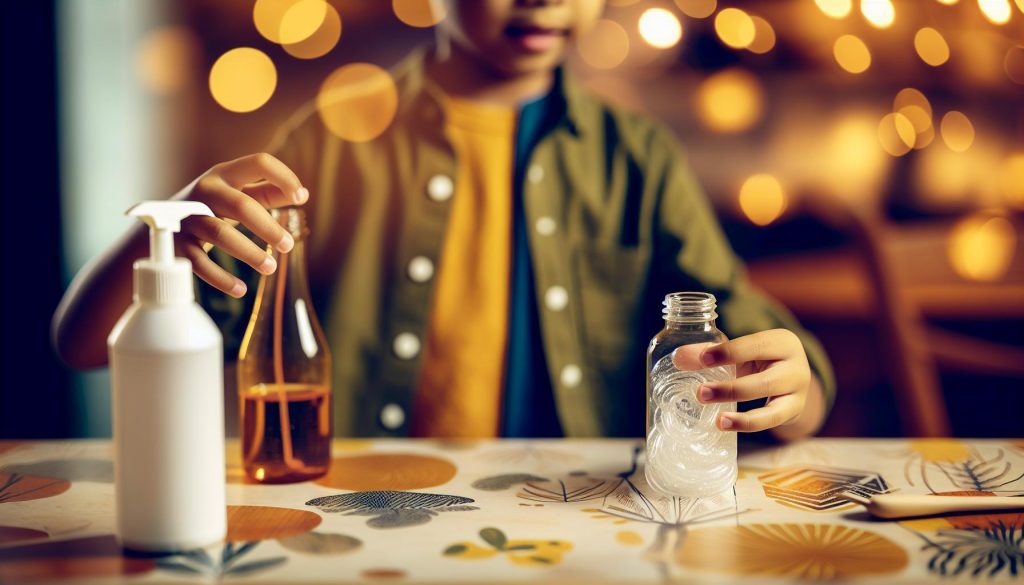
Testing Windex: How to Experiment Safely and Effectively
Experimenting with Windex in slime-making can lead to exciting revelations in how the right ingredients can create the perfect texture and consistency. As you embark on your slime adventure, it’s essential to conduct your tests with a sense of curiosity and care. Windex, with its unique blend of ammonia and other cleaning agents, may help to activate certain slime recipes, but knowing how to approach your experiments safely will ensure a positive experience for all involved.
To begin your testing, gather a few essential supplies that will make your experiments safe and fun. You’ll need a clean workspace, measuring spoons, and separate containers for mixing. It’s also wise to wear gloves and perhaps even goggles, as Windex can be caustic and irritating to the skin and eyes. Be sure to work in a well-ventilated area, as the fumes can be overpowering. As you test, observe how different amounts of Windex affect your slime’s texture-start with small amounts and gradually increase. This way, you can find the perfect balance without risking a complete slime fail.
Once you feel comfortable, consider creating a simple testing chart. This can help you track not only the amounts of Windex used but also the resulting slime texture. Here’s a sample chart you might include:
| Windex Amount | Slime Texture | Comments |
|---|---|---|
| 1 tsp | Too sticky | Needs more activator |
| 2 tsp | Perfectly stretchy | Great consistency! |
| 3 tsp | Overly liquid | Consider reducing Windex |
Not only does documenting your process help in refining your technique, but it can also serve as a charming craft project in its own right! As you gather your loved ones, this transformation of Windex into a playful element of slime-making can set the stage for an evening filled with giggles and creativity. Encourage friends or family members to also contribute to the testing; their observations can lead to delightful surprises as collaboration often sparks new ideas.
As you refine your technique and enjoy the process, remember that this experimentation resonates with the cottage spirit of patience and creativity. Slime-making isn’t just about the final product; it’s about the joyful exploration and the stories shared along the way. Gather your tribe, document your findings, and watch as the humble Windex unveils new possibilities in your crafty home!
Common Mistakes to Avoid When Activating Slime
As you dive into the wonderful world of slime-making, it’s easy to get swept away in the excitement of crafting your perfect creation. However, certain pitfalls can turn this joyous activity into a sticky situation (and not in the fun way). Learning from common missteps can elevate your slime game and ensure a delightful outcome every time.
One of the most frequent mistakes is not measuring the activator, such as Windex, accurately. Too little might leave you with a gooey mess that won’t hold together, while too much could result in a rubbery, overly firm slime. Start with small amounts when adding Windex, noting the changes in texture as you go. This careful approach also allows for collaborative creativity, inviting friends or family to share their insights and making the process all the more enjoyable.
Another misstep is neglecting the quality of your ingredients. The type of glue or base you choose significantly impacts the slime’s final texture. For example, using a clear glue can produce a different consistency than white school glue. If you want to see those vibrant colors swirl and blend, be mindful of how each ingredient interacts with your activator. It’s a bit like cooking-each flavor works together to create a delightful dish.
Lastly, remember to embrace patience. Slime-making is as much about the journey as it is about the result. Rushing through steps without allowing the mixture to fully come together can lead to disappointment. Take your time to knead and fold as needed, encouraging the slime to achieve its stretchy, tactile glory. This leisurely approach is a beautiful reflection of the cottage spirit, celebrating handmade joys and encouraging a slower, more mindful crafting experience.
By staying aware of these common mistakes, you can turn your slime-making endeavors into a cherished, stress-free activity filled with laughter and learning. So gather your ingredients, rally your fellow crafters, and let the magic of slime come alive!
Engaging Kids with Science: The Education Behind Slime Play
Engaging children in the delightful art of slime-making isn’t just a fun activity; it’s also a wonderful opportunity for a hands-on science lesson that can ignite curiosity and foster a love for learning. When kids combine basic household ingredients like glue, water, and an activator like Windex, they are not just creating a goopy treasure; they’re exploring the fascinating world of chemistry. The transformation of a liquid to a solid-like matter as they mix ingredients provides a tangible understanding of states of matter, viscosity, and the chemical reactions occurring right before their eyes.
Through the simple act of slime-making, children can learn about polymers, the long chains of molecules that give slime its stretchy properties. As they stir the glue with an activator, these polymers link together, creating a substance that is both gooey and elastic. Encourage kids to observe how different amounts of activator change the texture and consistency of the slime, providing a perfect segue into discussions about measurement, ratios, and the scientific method. What happens when less or more activator is used? Encouraging kids to make predictions and observe the outcomes enriches their critical thinking skills while embracing the spirit of experimentation.
Making slime also sparks creativity by allowing children to personalize their concoctions. As they explore various colors, scents, and glitter, they are engaging in a multi-sensory experience that enhances emotional development and fine motor skills. Invite them to experiment with natural dyes made from fruits or vegetables and discuss how different colors can influence moods. These additions not only make slime more aesthetically pleasing but also serve as a platform to discuss the natural world and the materials we can find around us, making science feel tangible and accessible.
The joy of slime-making is, at its heart, a celebration of hands-on learning that builds confidence and fosters a sense of achievement in children. Encourage them to share their creations, perhaps inspiring a community challenge where friends and family can showcase their unique slime artworks. This spirit of collaboration and sharing nurtures a sense of belonging and community, aligning beautifully with the comforting ideals of cottage living. So gather your supplies, dust off those measuring spoons, and dive into a science-inspired adventure that blends creativity with learning-creating not just slime, but lasting memories!
Creative Activities: Using Slime in Fun DIY Projects
Engaging with slime can open up a delightful world of creative possibilities, transforming a simple kitchen project into a charming DIY journey. Imagine crafting your very own slime-inspired décor or playful gifts, all while harnessing the fun of this gooey creation. By integrating slime into various home projects, you not only foster creativity in the little ones but also add a whimsical touch to your relaxing cottage aesthetic. So gather your supplies and allow your imagination to lead the way as you embark on some unique slime-infused activities.
DIY Slime Stress Balls
One of the easiest projects to begin with is making stress balls filled with slime. These comforting little creations can provide sensory relief and are perfect for soothing those busy minds. Start by taking a balloon and stretching it gently, then fill it with your favorite slime. Once filled, tie it off to create a soft, squeezable ball. You can add a few drops of essential oil to make it even more calming. Decorate the balloons with friendly faces or fun patterns to personalize your creations even further.
Slime Magnets
For a cute and magnetic décor project, transform your slime into interactive art! Create small slime blobs in various colors, then attach them to magnets. Use eccentric shapes or vibrant colors to create friendly characters or even seasonal themes. These delightful magnets can brighten up your fridge while serving as a creative outlet for your family. Children can learn about strengthening their fine motor skills as they mold shapes and practice sticking them on surfaces.
Slime Art
Why not take slime a step further and create mesmerizing artwork? Spread a layer of colored slime onto thick paper or canvas to form a unique textured background. Use additional colors to swirl and blend, creating dreamy patterns. Once the artwork is complete, display it in your cozy cottage space or gift it to a loved one. This not only allows kids to express their creativity but also introduces them to the world of art and texture.
Seasonal Slime Creations
Bring the magic of the seasons into your home by crafting themed slimes! For example, during the fall, make orange and brown slime, and add pumpkin spice scents for a cozy touch. In winter, create icy blue slime and sprinkle in fake snow for a frosty effect. Encourage kids to experiment with scents and textures that reflect the seasons, creating a multi-sensory experience that bridges nature with their imaginative play.
By incorporating these fun DIY slime projects into your home, you foster not just creativity but also a sense of togetherness. Sharing in these activities can strengthen family bonds while celebrating the joys of lifelong learning. Explore the transformative potential of slime and bring whimsy indoors, turning even the simplest creations into cherished memories!
Slime Storage Solutions: Keeping Your Creations Fresh
To ensure that all your delightful slime creations remain fresh and ready for play, thoughtful storage solutions are essential. A little bit of consideration goes a long way in preserving the textures and scents that make slime so captivating. When not in use, your homemade goo can dry out or become contaminated, so implementing the right strategies can help maintain its vibrant charm.
Start with airtight containers. These come in various shapes and sizes, so you can choose ones that best fit your slime storage needs. Plastic containers with snap-on lids work wonderfully to keep moisture in and odors out. For added fun, let the kids decorate these containers with stickers or paint to give them a personal touch. Encourage creativity even during storage!
When it comes to holding multiple colors, consider a divided storage box or muffin tin, which can keep your slimes separated while still showcasing their colorful nature. Each compartment can serve as a mini display, turning your storage solution into an engaging part of your cottage décor. Additionally, remember to label your containers with the slime’s ingredients or flavors, helping younger ones remember which ones might be their favorites.
Moreover, storing your creations in the refrigerator can extend their lifespan, particularly for slimes that contain perishable ingredients like yogurt or certain glues. The cool environment will help inhibit the growth of bacteria and mold, ensuring that your slime remains not just fun but safe to play with, too. Just be mindful to bring it back to room temperature before playtime, as cooler temperatures can harden some types of slime.
Lastly, always prioritize cleanliness during storage. Keep a range of cotton cloths handy to wipe any excess slime off your containers to prevent messes and preserve the freshness inside. By nurturing your slime properly, you’re not just sustaining a fun activity; you’re embracing creativity and inspiring a love for playful experimentation in your cozy home.
Share Your Slime Success: Join Our Community Challenge!
In the world of slime-making, the journey of creation is as delightful as the squishy outcomes. To celebrate the art and science behind slime, we’re inviting you to share your adventures and triumphs through our community challenge! Join fellow enthusiasts as we explore the playful experimentation with different slime recipes, including the fascinating question: Can Windex activate slime? This is a fantastic opportunity to engage in some light-hearted science while fostering connections with others in our nurturing crafting community.
Getting involved is simple and rewarding. Once you’ve crafted your slime using various ingredients, including household favorites and unique alternatives, take a moment to capture those vibrant creations. Share your photos, along with a brief story of your slime-making experience, in our dedicated online space. Did you try activating your slime with Windex or experiment with other solutions? Were there unexpected outcomes or delightful surprises? We want to hear all about it! Your stories can inspire others to embrace creativity, turning their homes into cozy, vibrant craft zones.
Not only will participating in our challenge spark joy and excitement, but it also helps cultivate a sense of community. You can form bonds over shared interests, swap tips, and celebrate each other’s successes. To make it even more engaging, we’ll highlight some of the most creative slimes and experiences in our upcoming newsletters. So gather your supplies, get your family involved, and dive into the world of slime creation together! Remember, the spirit of this challenge is all about fun, innovation, and connection-creating a space where artisanal beauty flourishes amidst simple joys.
Happy slime-making, and we can’t wait to see your shining slime successes! 🍀✨
Frequently asked questions
Q: Can you use Windex to make slime?
A: Yes, Windex can be used to activate slime due to its ammonia content, which helps the ingredients combine. However, ensure you follow a recipe that incorporates Windex as a safe activator, as it may not work well with all slime bases.
Q: What are the benefits of using Windex in slime experiments?
A: Using Windex can enhance the texture of the slime, making it more stretchy and pliable. Additionally, the process can teach kids about chemical reactions and the role of different ingredients in activating slime.
Q: Is it safe for kids to use Windex when making slime?
A: While Windex can be safe when used in small amounts and under supervision, it’s important to avoid ingestion and to conduct the experiment in a well-ventilated area. Always follow safety guidelines and promote good hygiene practices.
Q: How can you test if Windex activates slime properly?
A: To test Windex as a slime activator, mix a small amount into your slime base and observe the reaction. If the slime firms up and becomes less sticky, it’s working effectively! Be sure to stir well and adjust the amount based on the desired consistency.
Q: What alternatives to Windex can be used as slime activators?
A: Alternatives to Windex include contact lens solution, liquid laundry detergent, and baking soda mixed with vinegar. These can provide similar activation properties without the use of ammonia.
Q: Can adding Windex to slime affect its smell?
A: Yes, adding Windex may impart a slight scent to the slime. If odor is a concern, consider using a scented version of Windex or incorporate essential oils to mask or enhance the aroma.
Q: What common mistakes should I avoid when using Windex to activate slime?
A: Common mistakes include using too much Windex, which can make slime too sticky, or not mixing it thoroughly, which might lead to uneven activation. It’s best to add Windex gradually and ensure even incorporation.
Q: How do you safely dispose of slime made with Windex?
A: Dispose of slime made with Windex in a sealed bag in the trash instead of flushing it down the drain. This helps prevent potential plumbing issues and environmental harm. Always adhere to local disposal guidelines.
These FAQs cover crucial aspects related to using Windex for slime activation, encouraging education and safety while engaging readers in fun science experiments at home! For more on making your own slime, check out our “Step-by-Step Guide: Making Your Own Slime at Home.”
In Retrospect
Thanks for joining us on this playful journey of discovering whether Windex can activate slime! We hope you’ve enjoyed diving into this fun science experiment, understanding the magical transformations that happen right in your home. If you’re eager to unleash more creative fun, why not explore our related articles on DIY slime recipes or other exciting science experiments that will spark even more joy in your crafting adventures?
Don’t forget to share your slime-making successes in the comments below! Your feedback not only inspires us but also helps fellow readers find joy in their own cozy corners. For more delightful tutorials and ideas, check out our guides on seasonal gardening tips or charming farmhouse recipes. Remember, every small project adds a touch of handmade beauty to your life, so embrace those simple joys and keep the creativity flowing. Happy crafting!


